So you’ve finished editing your video and are now ready to export and share it with your clients and audiences. But before you hit that export button and send your masterpiece to the world, you must ensure you have the best possible settings so your content will look its best.
This is why film editors, videographers, and content creators must understand the basics of video exporting. It is a crucial step in the post-production process and key to publishing professional-quality videos.
Video exporting is not a complicated process. However, it does have certain nuances depending on the software you’re using and where your video will be posted or distributed.
In this guide, we cover the key steps of video exporting using three popular software programs: Adobe Premiere Pro, DaVinci Resolve, and Final Cut Pro. We also outline some pro tips on how to render professional-quality videos every time.
What Are the Best Export Settings?
In most instances, you may need to export your video several times if you plan to publish content on multiple platforms. For example, you need a 16:9 aspect ratio for YouTube and Vimeo and a vertical version for TikTok or Instagram stories.
If you’re planning to present your video in a cinema or art show, you’ll also need different specifications.
Here are some elements that will help you understand the optimal export settings for various platforms:
- Format: This is your ideal file format, such as .mp4 or .mov
- Frame rate: Refers to how quickly images are shown in frames per second (fps)
- Frame size: This describes the size of a single video frame in pixels (width x height)
- Field order: This specifies the order in which each group of video fields is recorded
- Aspect: This refers to the proportional relationship between the width and height of a video image
- Performance: This specifies the encoding performance of your video and depends on your system’s configuration
- Profile: This determines video decoding speeds
- Level: This defines the available choices for compression settings (frame rate, frame size, field order, aspect, chroma)
- Bitrate encoding: Defines the amount of data encoded within a timeframe
- Target bitrate: Denotes the quality and size of the video
How to Export a Video from Premiere Pro
Here’s everything you need to know about exporting a video in Premiere Pro.
- Getting Started
Select the sequence you want to export and open the Export window. You can navigate to File>Export>Media or use Ctrl + M (PC) or Cmd + M (Mac).
- Choose your format
Adjust the export format depending on where it will be published or hosted (YouTube, IG, TikTok, etc.) The standard format (H.264) is suitable in most cases and widely used. You can also use one of the presets set by Adobe.
- Save
Name your file and select your desired storage location. During this step, you’ll be asked if you want to export video, audio, or both.
- Video settings
Adjust basic video settings. Match the source settings and ensure all adjustments to width and height are done in sequence settings before initiating the export.
- Video quality
Toggle Render at Maximum Depth for the highest quality.
- Bitrate
Set your video bitrate settings.
- Audio export settings
Next, adjust the audio export settings. Pro tip: use Audio Codec AAC instead of MP3, as it tends to sound better per bitrate.
- Audio quality
Select Use Maximum Render Quality.
- Done
And finally, select Export.
Best Export Settings for Premiere Pro
Take a look at the optimal export settings for Premiere Pro that will help ensure high-quality output in H.264 format for both 4K and HD videos with seamless playback.
- Format: H.264 (.mp4)
- Performance: Hardware encoding
- Profile: High
- Aspect: Square pixel
- Level: 4.2 (5.2 for 4K)
- Bitrate encoding: VBR, 1pass
- Frame size: 3840 x 2160 (4K) or 1920 x 1080 (HD)
- Field order: Progressive
- Frame rate: Match to source video’s frame rate
- Target bitrate: 60 to 80 Mbps (4K) or 20 to 30 Mbps (HD)
Exporting for YouTube/Vimeo
If you need to export your video for YouTube or Vimeo with Premiere Pro, here are our recommended settings:
- Format: H.264 (.mp4)
- Frame rate: Match the frame rate of the source video
- Field order: Progressive
- Frame sizes:
- HD: 1280 x 720
- UHD: 3840 x 2160
- Full HD: 1920 x 1080
- Quad HD: 2560 x 1440
- SD NTSC Wide: 854 x 480
- Aspect: Match the source video’s aspect
- Bitrate encoding: VBR, 1-pass
- Target bitrate: 8 Mbps (45 for 4K)
Audio settings:
- Audio channels: Stereo
- Sample rate: 48 kHz
- Audio format & codec: AAC
Tips for Exporting a High-Quality Video on Premiere Pro
If you’re exporting a video for YouTube, there’s an export preset in Premiere Pro that can automatically optimize it for the platform:
- Navigate to File > Export > Media File
- Select YouTube and turn on the switch to access all settings.
- In the Preset drop-down menu, select YouTube 1080p Full HD for an optimally tailored export. If this option does not readily appear, look for it in the Preset Manager dialog box.
- Click Export.
More Useful Tips
Premiere Pro’s Previews are optimized for playback rather than image quality, so if you select Use Previews when exporting, the previously generated render files will be used.
You can enjoy maximum speed and optimal export quality with a high-quality codec in your previews.
How to Export a Single Clip
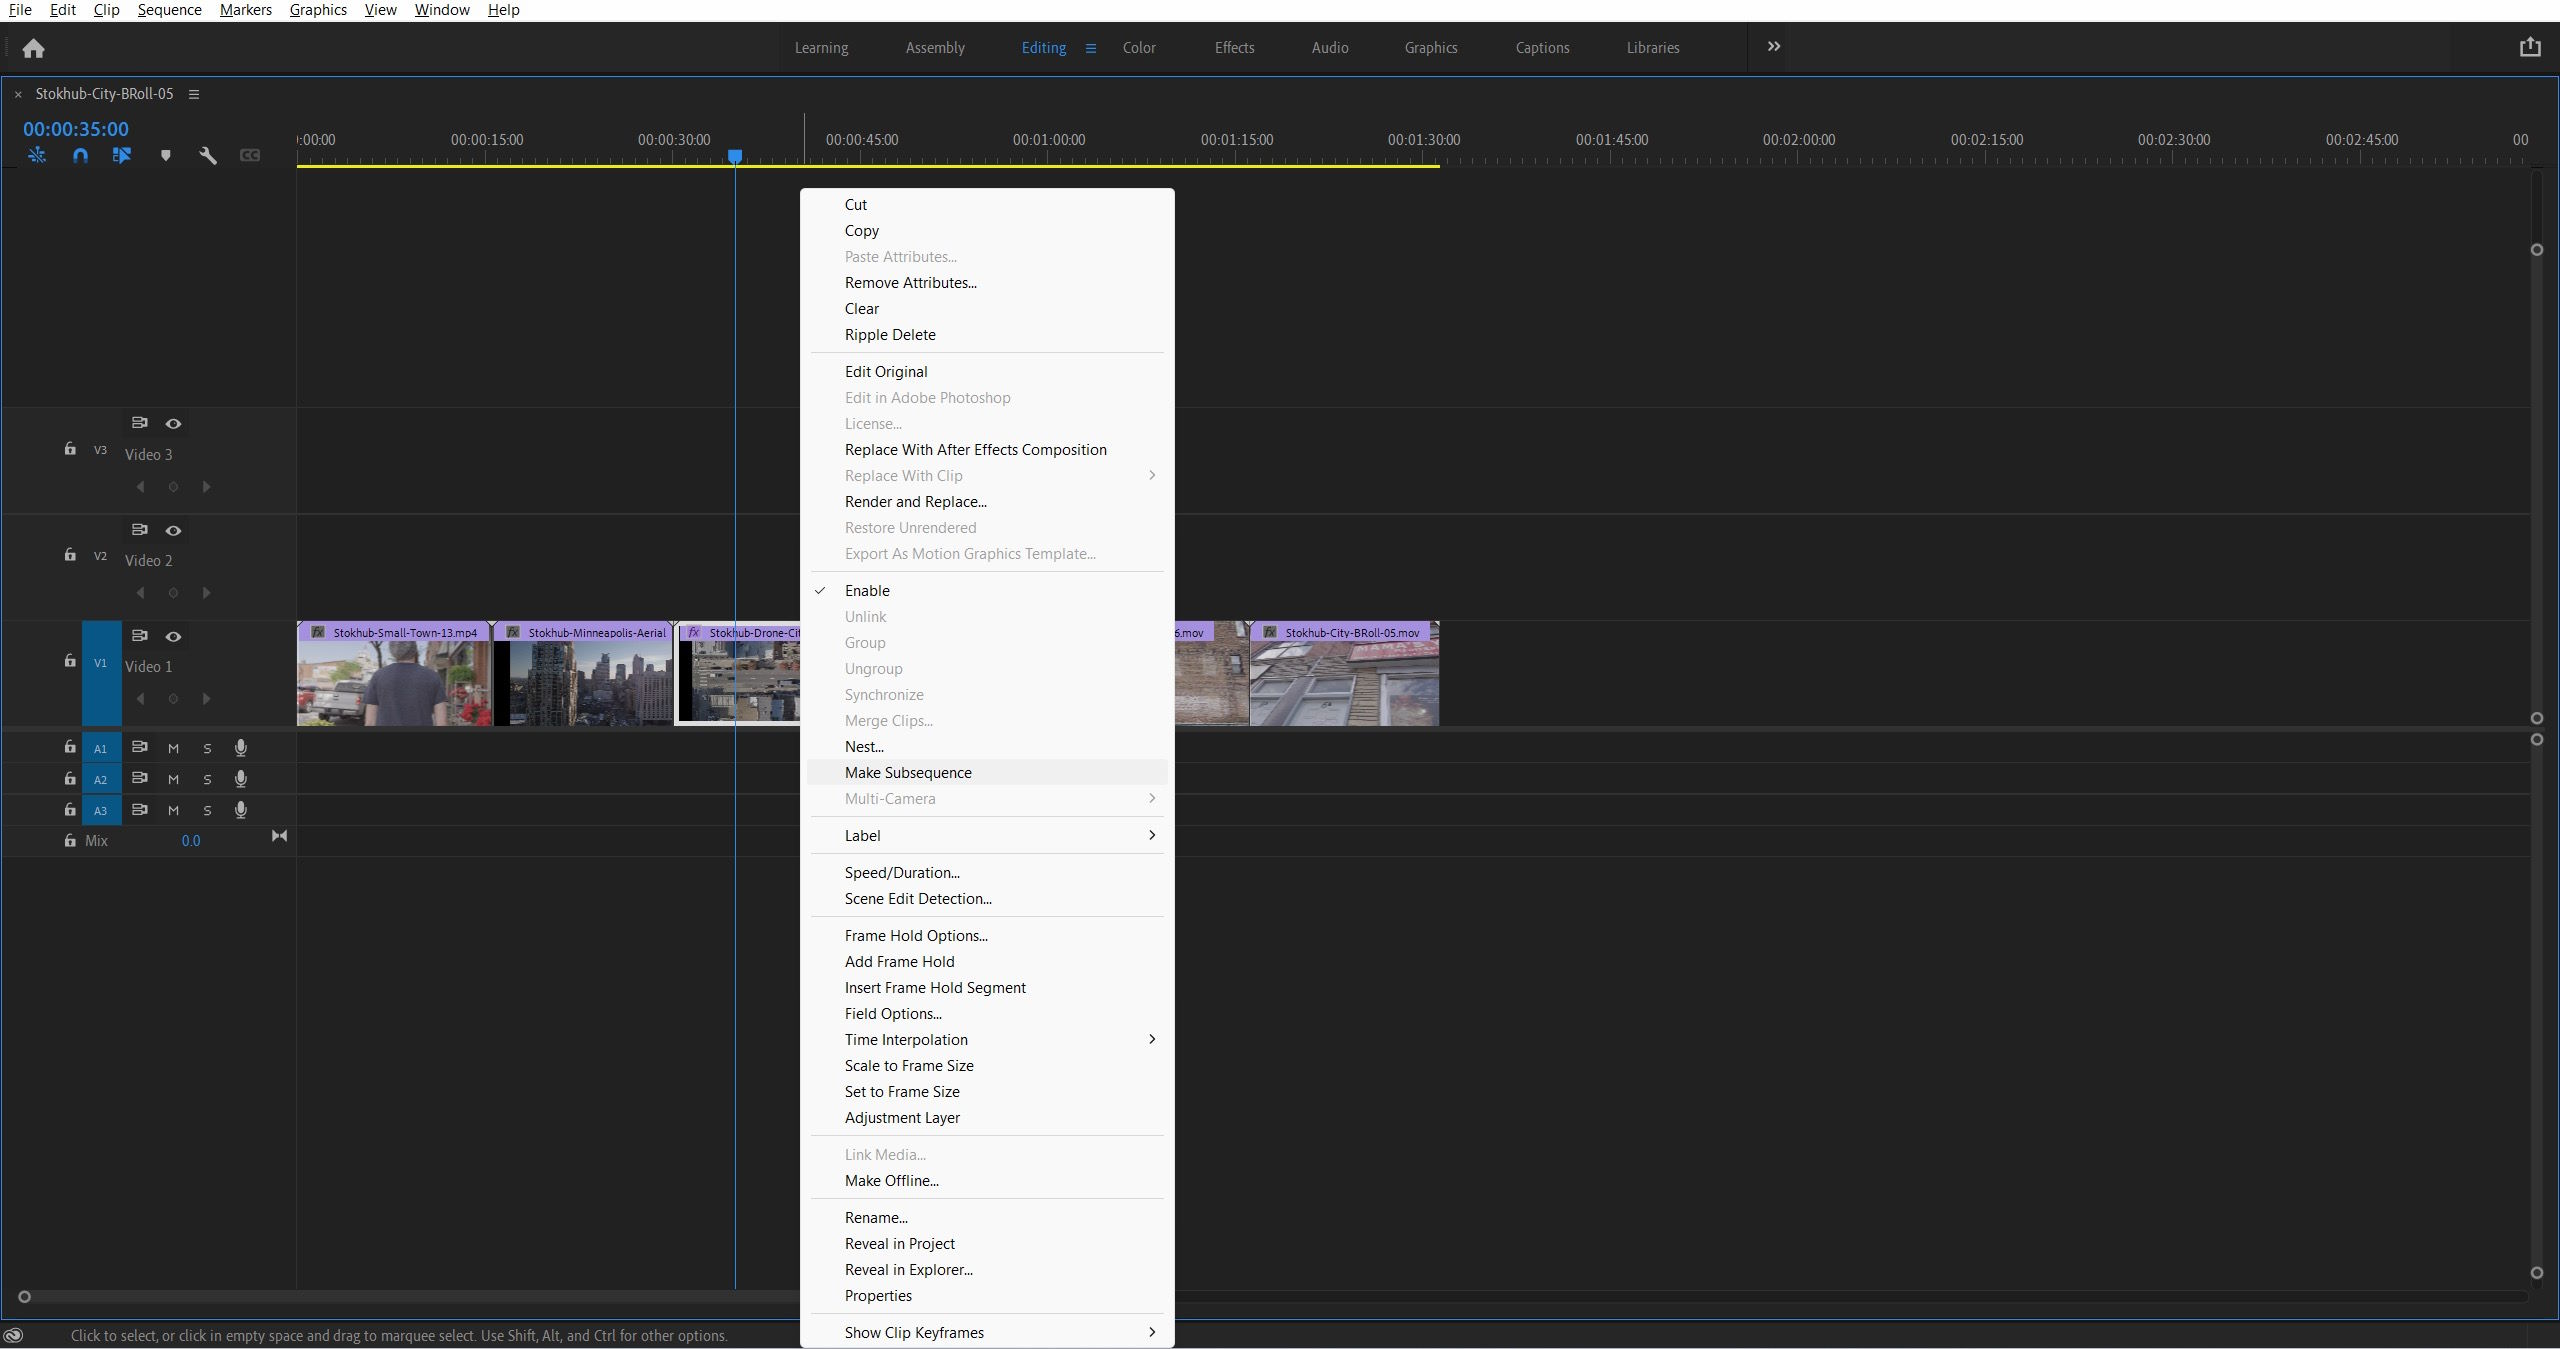
If you’d like to isolate a single clip from your timeline to export, here’s how:
- Select the audio or video clip (or both).
- Right-click on the selection and tick Make Subsequence.
- Select the subsequence by double-clicking the icon on the left side of your workspace.
- Go to File, then Export.
- Check your export settings, then click Export.
How to Export a Video from DaVinci Resolve
Step 1: If you want to customize your export settings, scroll down and click the Deliver tab. You can also choose the Quick Export option to use standard presets. You can access this at the upper left of the screen.
Step 2: Click Custom Export if you’re not using presets. Name your file and select your desired file location.
Step 3: Navigate to Format and open the drop-down menu to select your desired format.
Step 4: Choose your desired Resolution. To find out which one best fits your project, click on Media at the bottom and select the timeline you wish to export. Select Timeline > Timeline Settings. A window will appear that shows your timeline’s resolution. To ensure optimal results, do not use a resolution bigger than the video size.
Step 5: Navigate back to Deliver, then to Quality. Click Restrict and set the bitrate.
Step 6: Click Add to Render Queue.
Step 7: The video will appear in the Render Queue. Simply click Render All to begin the export.
Best Export Settings for DaVinci Resolve
Here’s a complete list of the optimal settings for this software:
- Format: MP4
- Codec: H.264
- Render: Single clip
- Encoding profile: High
- Key frames: High
- Resolution: Ensure that your footage is displayed in the highest possible resolution; if you are using 4K, select 4K here.
- Quality: Pick the Automatic setting and choose Best.
- Frame rate: Should match your footage
- Advanced Settings: You can keep the default settings—no adjustments necessary.
Tips for Exporting a High-Quality Video on DaVinci Resolve
Go to the Deliver page when you’ve finished editing. Select Custom Export under the Render Settings panel on the left-hand side of the screen.
Opt for Mp4 or QuickTime as your Format depending on what suits you best. For a 4K UHD export, adjust the Resolution to 3840 x 2160 Ultra HD.
More Useful Tips
We also recommend H.265 Codec, which is highly efficient and has a smaller file size compared to H.264.
If available, set Encoder dropdown settings to Nvidia. If not, leave it at default.
As for Quality, you can manually set it or pick Automatic > Best.
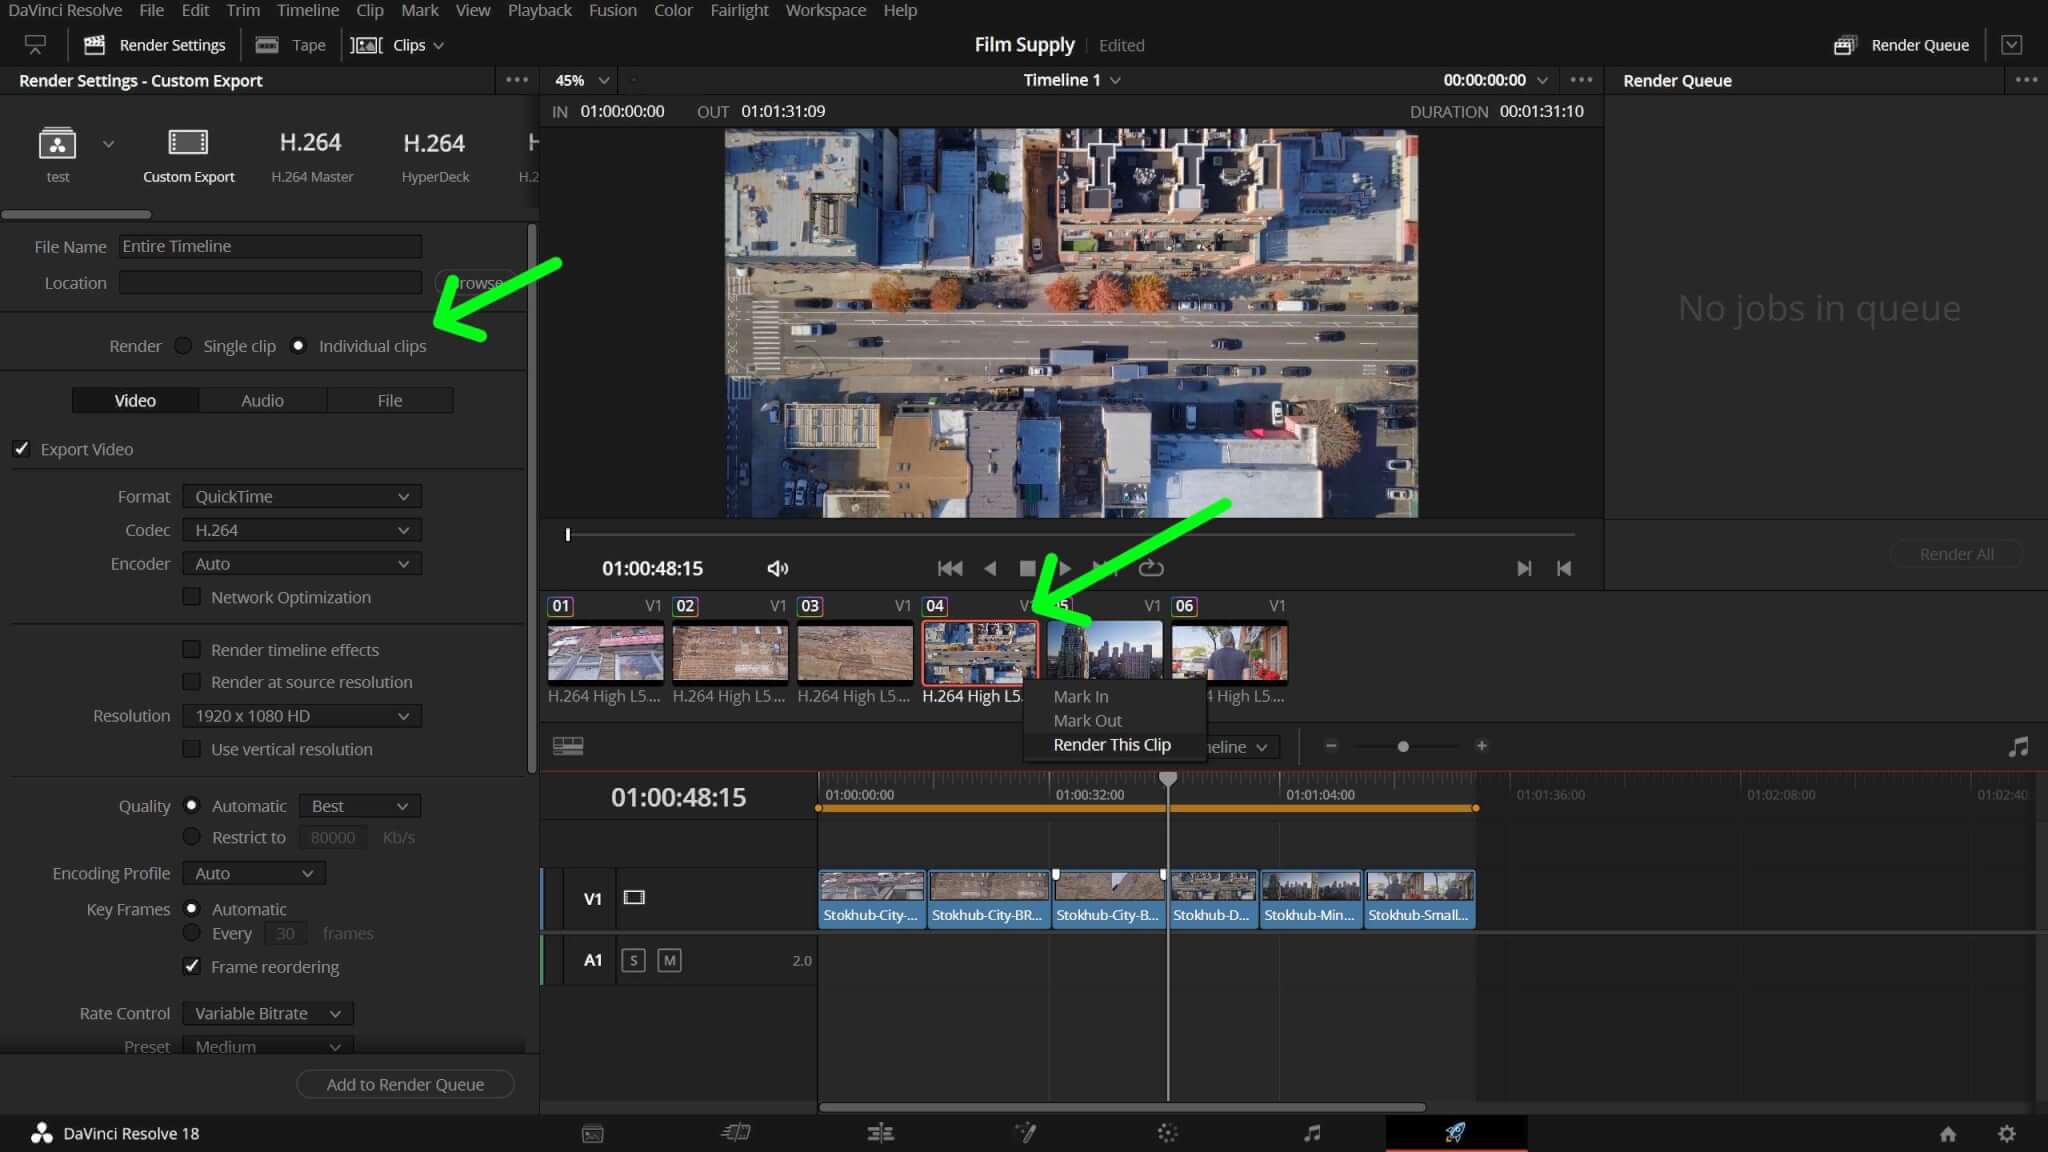
How to Export a Single Clip
On the Deliver page, select Individual clips in the Render option. This will render each clip separately and not as an entire video.
How to Export a Video from Final Cut Pro
This easy-to-follow guide will have your video ready in no time.
Step 1: When batch sharing, choose projects or clips only.
Step 2: To choose a range in your project’s timeline, use the I and O keys to identify starting and ending points.
Step 3: Navigate to File > Share > Export File.
Step 4: Click Share then Export File.
Best Export Settings on Final Cut
In the export settings dialog box, you can keep your current export settings or modify them according to your desired codec. If your computer can handle large files, go with Apple ProRes 4444 XQ. If storage is an issue, H.264 QuickTime offers a great balance between quality and efficiency.
Tips for Exporting a High-Quality Video
With the Export File command, you can conveniently share your finished project in a high-quality file format for post-production or broadcast.
More Useful Tips
To get the highest quality output when sharing a project that uses proxy media, open it in your timeline and select Optimized/Original from the View pop-up menu located at the top right. With this setting, optimized media will be used for creating your shared file if available; otherwise, original media is used instead.
How to Export a Single Clip
To export the clip of your choice, open your browser and select the clip. Click the Share button to choose where you’d like to save it.
You can also export multiple clips at once by pressing and holding the Command key while selecting each clip you wish to export.
Final Thoughts
Exporting videos can be tricky if you don’t know the best settings for your video. But with this guide and a few useful tips, you’ll have your video ready for sharing in no time!