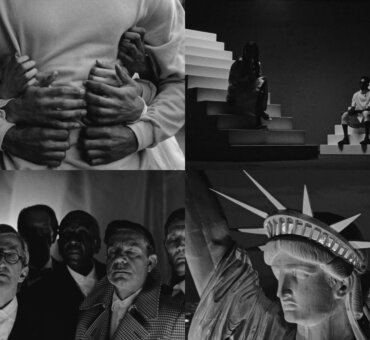
Statues are the object metaphor at the heart of Carved in Mayhem. I wanted to draw on the idea that we are all shaped by our surroundings — of which many elements stand beyond the reach of our control — and ultimately create a depiction of being sculpted by fate. Including statues in the film, then, was a nonnegotiable. The problem was how. How do you put large iconic sculptures into a controlled environment with just a passion project’s budget? And for the statues to be a strong representation and communicate part of the visual storyline, they had to be featured. They couldn’t just be background elements. The audience needs to feel the threat of death in Hercules Fighting the Centaur Nessus and the hopelessness and suffering in Laocoön and His Sons. The statues had to be up close. So the practical side of me was like, Okay…how?
THE MODELS
Practical vs. CG
The existing statues that I found to further the story were from many historical periods and housed throughout Europe. My initial thought was maybe we could go to those places and film the actual statues. However, I was concerned the film would lose its cohesiveness with the variety of environments, lighting, etc. It would turn into something montage-y without the intentionality of placing them all in one singular world. It was important to me that the film have a strong, unique look. I wanted to create an environment where all of these figures lived in one location, one place.
So, still thinking of practical in-camera statues, I began looking into using 3D printing scale models. Basically what you can do is put them in a room and use a motion control rig to scale the camera movements. So let’s say you have a quarter-sized model. It’s 3 feet tall, but you want to make it look 12 feet tall in the space. What you have to do is actually scale the camera moves to make it feel like it’s 12 feet tall within that environment. So if you want the camera to make a 4-foot lateral move in the space, you have to proportionally scale that move down to the statue, so it becomes a 1-foot lateral move. The benefit is the statue is already in the space and utilizes the existing lighting. And if your scale model looks pretty spot-on, you’re set.
However, the more I thought about it, the more I realized that if I were going to go through the process of printing out 3D statues, then I’d still need to build or acquire 3D models, relying on a visual effects team, as well as needing support from the art department to clean up, paint, and detail the 3D prints. I weighed the options as far as which needed the most crew/artist support, as well as what was financially plausible, and I landed on CG statues…without really knowing the “how” just yet.
Failed Experiments in Photogrammetry
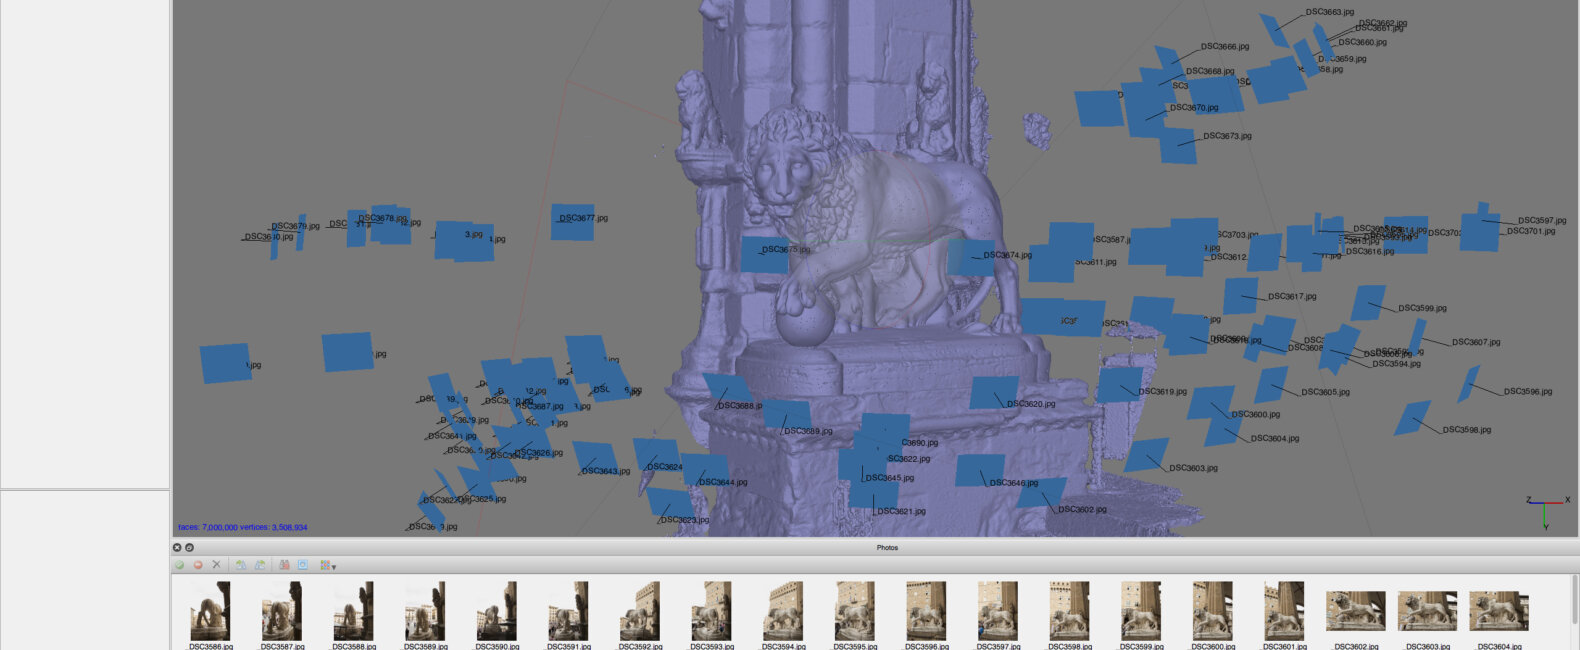
I don’t want to call this part of the process a complete failure, because it was definitely a learning experience. But it was mostly a failure. There’s a really interesting surveying/VFX technique called photogrammetry in which you take countless photos of a static object from many varying perspectives to map out that object. The photos are processed through software (I used the $200 version of Agisoft PhotoScan) where they are triangulated in 3D space to find the source location of the photo. And through the resulting point cloud, a 3D mesh is ultimately generated. The software then uses the photos to texture this 3D mesh. In short, it allows you to create a textured 3D model simply by taking a lot of photos of an object. After doing a bit of research and small tests, I thought this would be perfect for Mayhem since the statues are stationary and all of the ones I wanted to use in the film are on public display.I decided to go to The Met to do a full-scale test on the statue Ugolino and His Sons, taking photos from three different heights: kneeling, standing, and then with my arms above my head. I took a photo about every 10 degrees and at each height, so roughly 36 photos at 3 different levels, totaling a bit over 100. I also went in close to test the details that I may want to focus in on during the film. Then I dropped all of those photos into the program, set a few levels, and let it work its magic. The process can take anywhere from 12 hours to a few days, depending on the thresholds. You just leave it going in the background, and when it’s done you have this really, really impressive — although really, really rough — model to work with. There are missing sections and details, but it takes barely any effort at all. I felt like it was probably a good starting point. I was basically doing my own research to see how far I could push the software. But I felt like this should totally work, and I’d be able to bring on a 3D modeler at this point to fill in the gaps and clean up the mesh/texture. I even hired a photographer in Florence to shoot specific statues there and begin assembling a bank of statues to use in the film.[nectar_single_testimonial testimonial_style=”bold” color=”Default” quote=”I sometimes get this deflated feeling when I can’t create things on my own, but that usually leads me to just sort it out with whatever means necessary.”]What I came to discover is that the limitations of photogrammetry are quite prominent. The details that I was hoping to achieve would require an incredible amount of work from 3D artists (which I am not). It would have worked proficiently for background statues; but to get close-ups, it would have been just as much work to clean up these generated meshes as it would to create models from scratch. Or at least that’s what I discovered after we brought in the VR experts at Framestore. They had a four-week window in which they were able to contribute 3D support. After the team looked at the photogrammetry models I’d made, they basically said that fixing one statue alone would take nearly all of the time they had. It would be easier to build them from the ground up. So I was left with either perfecting just one of the statues or trying to find another method.
Statue Hunting
At this point, the edit was locked and I knew exactly how many statues and in what environments I needed them. I sometimes get this deflated feeling when I can’t create things on my own, but that usually leads me to just sort it out with whatever means necessary. I wasn’t about to use all of the CG window to refine just one statue. So I started digging around and ultimately sourced models from a couple of sites like TurboSquid and a personal blog where I found a modeler who’d sculpted one of the statues for her student project. I sent her the treatment for the film, and she ended up giving us the model for free. She was really excited to have Framestore texture and light it, taking it a step further.
In the end, after the experiments and research, I ended up sourcing the models in a pretty traditional manner. I was hoping to utilize a unique process, but I ended up landing on one that wasn’t the most exciting. And sometimes I feel like I should be past being super scrappy since I’ve been doing visual effects work for six or seven years. But I think that will always be present: no matter how far along you get, you always have to be smart and scrappy. And I feel like this need for resourcefulness is all the more true when it’s a passion project.
PRODUCTION
The C-Stand
For production, we built a rudimentary tracking reference. It consisted of a C-stand with two sets of rods coming off it, along with a gray ball for lighting reference and a Macbeth card for color reference. On the rods were illuminated tracking markers, giving us something to look at when we were composing shots for the statues. Basically the plate shots were these nice camera moves, looking around, tilting up. It’s always funny shooting some $2 dowels with Ping-Pong balls attached to the ends, and trying to convince your crew, “Yeah, don’t worry. There’s going to be a 12-foot marble CG statue there later.”
Light
On set, we had a VFX supervisor capturing 360 HDR images (High Dynamic Range images) from the position of wherever the statue would be added. Later, each HDR was stitched, put on a sphere, and used to light the CG using the different HDRs for the different rooms. Sometimes CG lighters will set up CG lights to sort of mimic the lighting on set. But with 360 HDRs, you are able to use an actual representation of the on-set lighting. It makes it very accurate. One of the things I love about the Framestore is they are emphatic about accurate lighting.
Shadow
We also created shadow plates, which is where you block out the key light and capture what the shadow looks like in the room. Sometimes there’s not enough time on set to capture this asset, so compositors are forced to darken down the plate based on a shadow mask from CG. But that isn’t accurate because shadow isn’t just graded-down illumination; it’s actual obstruction of light. With Mayhem, we’d decided not only to shoot in black and white, but also light it with very hard light, which I knew would need shadow plates for seamless integration. We captured these shadow plates to get more accurate shadows of the CG statues that we’d add later on. It’s not complex at all. It’s our VFX supervisor standing there with a piece of cardboard and blocking out the light. However, it’s extremely effective.
Lens Decisions
We shot the whole piece anamorphic except for the CG shots, which we shot with spherical lenses. The simple reason is that when you do CG with anamorphic lenses, you have to shoot lens grid references, which are just black-and-white checker boxes. Basically it shows you the distortion of the lens as it warps the grid, which ultimately needs to be worked into the post process. It was a technical/resource-based decision over creative. And since it was only a handful of shots, you don’t really notice.
Organization
One thing we were really careful about was taking detailed reference material and notes while we were on set. Production occurs often weeks — or in our case, months — before the CG team is involved, so it’s important to keep notes of everything. This consisted of camera/lens info per shot, frame rate, and room layout — all organized based on the shots. This allows you to have a much smoother process and clarity in handing things off to your post teams. Ideally you should be creating in post, not just fixing production mistakes.
ASSEMBLY
With the HDRs built, Framestore’s lighting technical directors began building a marble shader to use on the different statues. The shader would mimic the look of marble under our on-set lighting (i.e., the manner in which light bounces off, but also how rear lighting scatters within the stone; the way it self-shadows; how hard its shadows are; etc.). In the first two statue shots, they were even able to include the movement of shadows from the lighting through the trees.Before we shot the project, I had decided with my DP, Khalid Mohtaseb, to do the project in black and white. So everything on set was monitored in black and white but captured in color. When it came time for the VFX shots in post, we carried all of the color information through these steps, because completing the VFX shots in color made the comps more accurate. Different lights have various lighting qualities throughout the spectrum, so completing the shots in color allowed us to treat light differently through the channels.
Between all of the assets that we were able to capture on set, as well as the detailed renders from Framestore, the compositing portion was pretty straightforward. The 2D integration process is contingent on what your 3D department gives you, and we were fortunate enough to be given renders out of the box that looked pretty fantastic and sat in the scenes without much effort.I have always felt quite adamant that the function of visual effects is to stand in support of storytelling, as opposed to drawing attention to itself. It’s often a job done in the shadows: the harder it is and the better you are at it, the less it’s noticed. The objective of finding the most accurate and precise approach throughout the process isn’t for the sake of the technique, but rather so the visuals will blend seamlessly into the background and propel the story forward.
Carved in Mayhem is just one of Dan’s many great, Staff-Picked short films. To explore more of his work and license his footage, click here.